While I was at a local Farm supply store a couple of weeks ago I saw that they had a lot of 60 gallon plastic barrels for sale at $7.50 each. These had food in them originally and came in black, orange and light blue. I made a mental note and went about by business.
This weekend I picked up three of the barrels, all black. Two for a rain water catching system I had been wanting to build and one for a larger alfalfa tea barrel. I had been using a 22 gallon trash can and it was never enough.
I decided to take some pictures of the process in case anyone is interested and has access to barrels like this. FWIW they can sometimes be obtained at a soda bottling plant.
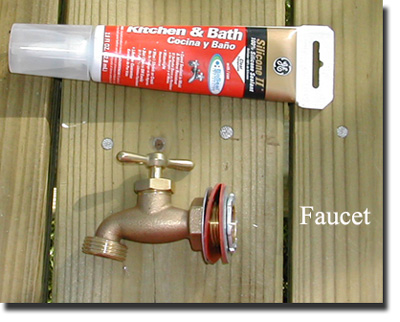
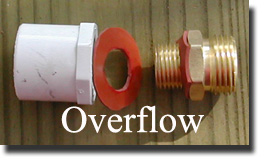
The plan I had envisioned had a faucet near the bottom and an overflow near the top for the rain barrels and a faucet only for the alfalfa tea barrel. I picked up a faucet with a larger internal opening for the alfalfa tea as there is a lot of sediment when the alfalfa settles and I didn’t want the faucet getting clogged. Make sure you get something that has hose threads on one side of the overflow. They are different than regular brass fitting threads.
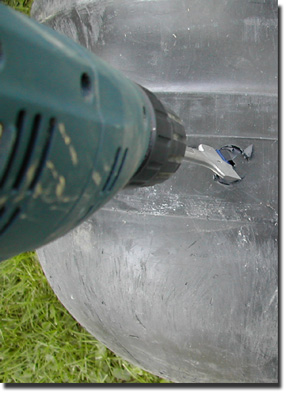
I started by rinsing out the barrels. Mine had originally had peas in two of them and black olives in the third. After they had been rinsed and dried a bit I drilled the holes. The hardware I had purchased called for a 1″ hole for the faucet and a 7/8″ hole for the overflow. I situated the faucet hole a little up from the bottom. The residual water will help weigh the barrel down in addition to raising the faucet up a bit.
I prepared the faucet, two rubber washers, two metal washers and nut. A bead of 100% silicone went between the barrel and the rubber washer on each side of the barrel. I needed help getting the faucets attached as I literally had to crawl into the barrel to attach the nut assembly while someone held the faucet in place on the outside. The first time I tried it I got stuck. Needless to say, had I not had someone there to help me out of the barrel I would have freaked. It was dark, hot and I was stuck. I ended up standing up with the barrel on me down to my waist. Fortunately my helper didn’t see the digital camera sitting on the table before they helped me out. I am sure that was quite a sight to behold. Once she stopped laughing hysterically she was able to help me out of the barrel. I rethought things and found that it worked out pretty easy when I laid the barrel on its side on the picnic table. I kneeled on the picnic table bench, made sure I had all of the needed equipment (flashlight, tools etc) in the barrel and put both arms inside as I wiggled in up to my waist. It was a tad bit warm (make sure you do this in the shade) and I had to back out a couple of times to get some air. Finally I had the faucet attached.
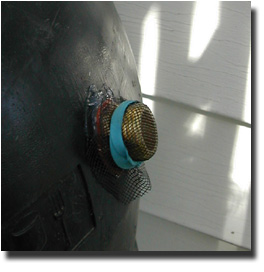
Next I stood the barrel up and attached the overflow. I will attach a hose to this to direct the water to a nearby bed. I could also attach a short pieces of hose and hook it to a second barrel if I wanted to get really ambitious. For now I covered it with screen.
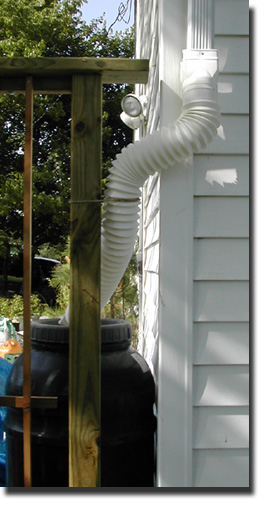
I purchased a flexible downspout and attached it to the existing system.
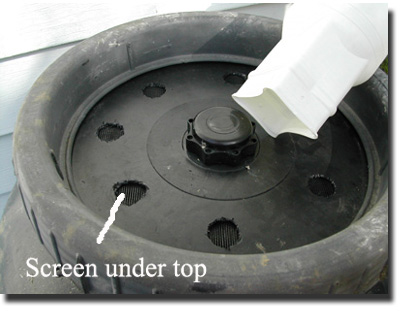
The top is in two pieces almost like a canning jar. This barrel also has a small threaded opening in the center. I drilled some 1″ holes in the top and put a double piece of window screen over the barrel opening, then the lid then the ring. This should keep mosquitoes out. Also, any leaves etc that come down the spout will gather on top of the barrel and can easily be removed.
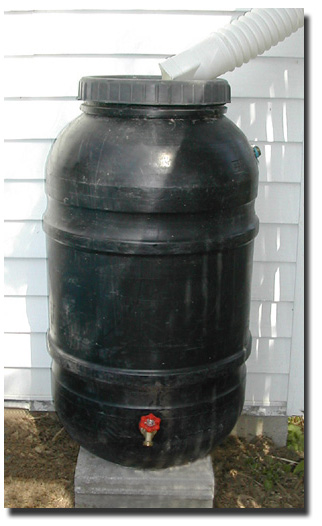
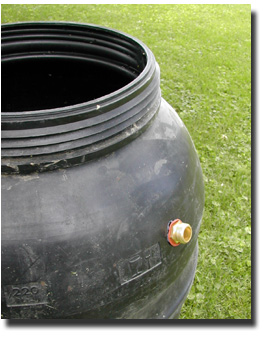
Here is one of the two barrels. I placed each up on two cinder blocks to raise the faucet up high enough to get my watering can underneath. The second rain barrel attached to another down spout. After allowing the silicone to cure overnight, I tested this out this morning by putting the garden hose up the spout and turning it on full blast. It handled the water easily and no leaks at the faucet (yeah!). Now I am gathering water from one half of our roof. In all each barrel probably cost me about $20 to make. Recycled food barrels now recycle rain water.
Kerry this is a really great how-to posting. I’m curious about your local farm supply store. Which company is it? I recently bought a rain barrel from a group here in Lexington called Bluegrass PRIDE. Bluegrass PRIDE is a not-for-profit group that does a lot of worthwhile environmental work. I paid quite a bit more for my barrel than you did, but of course mine was already completely assembled and the money went to a good cause. However, I might like to put together some more barrels in the future and your plan is very appealing. Please feel free to e-mail me if you’re comfortable sharing some more information. Thanks! Frank
Frank, I picked these up at the Bi-County Southern States Coop in Florence. I don’t think they sell them at all of the SS though as I’ve been to another local store that didn’t have any barrels. I have seen the same barrels at a local salvage yard in the past, they may be getting them from the same source.
I am in the process of building a three story (thats three barrels, not three floors of a building) high rain catchment system. The barrels fit together perfectly!! However, I have had absolute 0 luck finding metal washers that are THIN like the ones in your pictures, NOR have I been able to find rubber gaskets that have the correct size inside diameter.
Can you help me find such simple equipment?
Thank you,
Brett & family
Brett,
Three high WOW! I hope they are on solid ground. They weigh between 400 and 500 lbs each full for a 50-60 gallon barrel. I am probably going to add a second barrel next to the existing ones on both downspouts I have covered now. I was amazed at how quickly both barrels I have filled up with our last two rains.
When I went to the hardware store to get my supplies for the barrels I got lucky. I was helped by a gentleman that had recently done the same thing I was trying to do.
The gasket material can be purchased in a sheet. I am not sure where it was in the store because the man helping me disappeared and came back with package containing two 6″ square sheets of rubber. I cut out the washers to exactly the size I needed. For the metal washer and nut, head over to the electrical section. Take your faucet with you to make sure the threads match. The lock nut has ridges in it that make tightening it really easy. Remember, I was inside the barrel doing this. Once I had it finger tight I used a straight screwdriver and a hammer to finish the tightening. The nut actually digs into the metal washer and stays there. Since these are not plumbing nuts and washers, I am not sure what their lifespan will be. I may be replacing them in a year or two. For the price and convenience though I couldn’t find a better solution. If this water is to be caught for drinking, I would probably let it set for a while and have it tested to see if anything was leaching out of the metal pieces since they are not plumbing parts to begin with. In my situation though the water doesn’t sit in the barrels long enough to pick up anything before I use it on the plants.
Congrat on your rain barrel! It sounds cheesy, but every little bit of conservation helps!
Found a great website that might help you make a ‘neater’ barrel and this design seems to really make sense too. http://www.youtube.com/watch?v=H6ndwzVu8Pw
Kerry,
What a small world, I live in Burlington, I just got back from the exact same Co-op getting a barrel and was looking for ideas on the net on how others set them up and came up with your site.
Great info, thanks alot.
One question though, what about the barrels freezing in the winter? How well did the barrels hold up or did you just keep them drained
Hi Gary,
Don’t they have THE BEST prices on those barrels? I had to pick through a few to find a good one and ended up taking a leaky one back. They swapped it out no problem. Before you cut into yours you might want to fill it with water and see if it leaks anywhere. I suppose I could have sealed it with silicone but didn’t want to take the chance.
After the plants started going dormant and didn’t need any more water from me I emptied the barrels (not a problem since we didn’t have squat for rain last year). I reconnected the down spouts I had removed to install the barrels and turned the barrels upside down to prevent water from gathering in them. I do have an alfalfa tea barrel that has been sitting about 1/3 fill in the garden all winter. I checked it last weekend and it is still there, no leaks or cracks. Not sure I want to open it any time soon. When I do I had better make sure the wind is blowing away from the house lol.
Good luck with your barrels. Let me know how it goes. I am always looking for new ideas.
k.
Hi Kerry,
I posted here about a year ago when I was trying to figure out a way to make a rain barrel of my own. Since then I’ve made a couple using a variation on your basic scheme. I recently posted a piece on my new blog about how I did it. Take a look here . . .
http://fbjones.wordpress.com/2008/04/14/a-do-it-yourself-rain-barrel/
Thanks for giving me a good start on a worthwhile project.
Frank
Hi Kerry,
We used your instructions and tip on the co-op in Florence to build a rain barrel. So far so good…
Thanks so much-
Gillian and Ralf
Cincinnati
How cool is that? Glad to hear so many new rain barrels are coming to life. Enjoy your project.
Excellent guide on how to to build your own rain barrel system. The only way to really get an affordable barrel is to find reused/recycled ones for sale. Make sure they are food grade first!