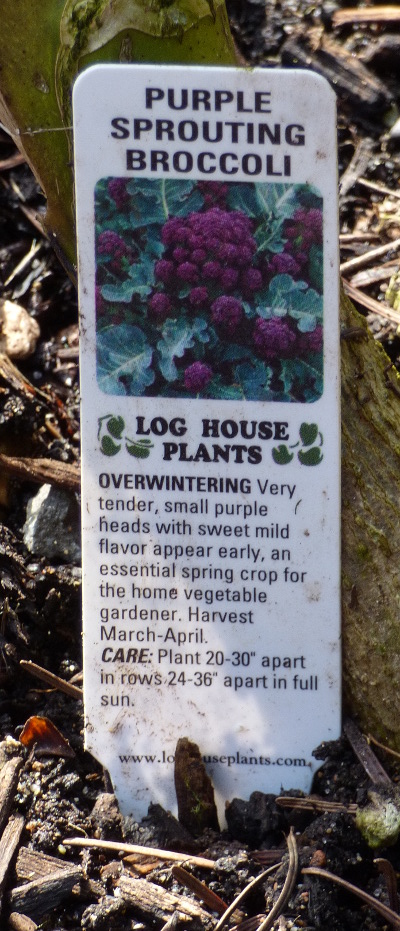
The broccoli is going like gang busters. There are three plants remaining and all three are between two and three feet high. Given their height and the fact that the more they grow the more top-heavy they will be, I decided to stake them. All three are a purple sprouting type so while there won’t be any large heavy heads to weight them down they will probably appreciate the added support. That being said a good wind might still knock them over.
On the 2015 gardening calendar I had set aside this weekend to plant peas and spinach. Given the amount of rain we tend to have this time of year most gardeners advise against seeding anything for at least another month. When I was plotting out the calendar I decided to live dangerously tho and go ahead and try getting some things in early. If they rot I can replant later but if the weather cooperates I will have an early crop. It seemed like a win-win.
While I was there I decided to use some short sticks to mark out the planting areas based on my map. I was happy to see that my guestimation of where the overwintering items were located was spot on.
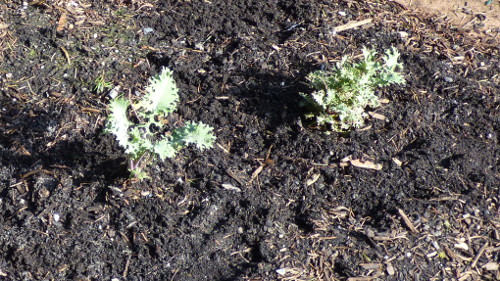
Overwintered Kale 2015-02-21
I found that I had lost a kale plant since my last visit. The space appeared as tho someone had weeded it. One of the drawbacks of a community garden is that the powers that be sometimes get to things before I have a chance too. I appreciate the effort but would have liked to have seen what the issue was with the plant if it was still there at weeding time. It could be that it had been eaten or died down to nothing by then. I’ll never know. In any case I am glad that the three that are left are in line with each other. This gives me an extra space to plant something else. Of the three that remain, one has very few roots. It came out of the ground very easy when I tugged on it. I could see new root growth and didn’t see any larvae but at this point I am not sure it is going to live and not sure what the problem is. I fertilized around all three and tucked them in snugly and am hoping for the best.
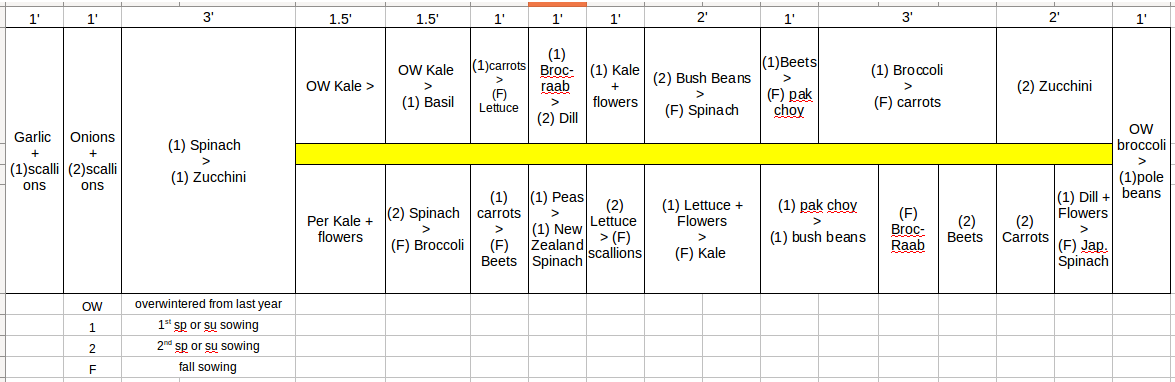
2015 Garden Map
The seeds I planted in the container a week or two ago are mostly up. I’ve thinned them once to two individuals per cell. They are enjoying all of the sunshine we have been having.
After some false starts I was finally able to get a garden map created for 2015. The garden is 10’x20′ with a narrow walkway situated in the middle that is about 3/4 of the length of both plots. This effectively gives me two 4 1/2′ x 15′ beds and one 10′ x 5′ bed. I’ve broken these into smaller sections and have come up with a plan I think will work. It includes multiple plantings in each space, hopefully giving each the time they need. I tried to pad several weeks on either end of each crop to cover weather delays, elongated harvests etc. I took the information and plugged it into a chart to tell me when each crop needed to be started from seed, direct seeded or transplanted. I could be way off the mark with my expectations but as this is an experiment in learning, whatever happens is knowledge to help make next year’s garden plan more on the mark.
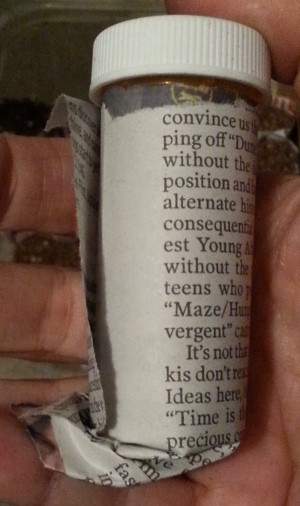
Several of the early season crops like lettuce, broccoli-rabb, pak choy, chives and kale can be started early and planted out when the incessant rains stops. The ground is entirely too wet to get into now but there are some things that could be planted now, given our avg last frost date of the third week in March. These I decided to start in little paper cups on the balcony and plant them out when the weather is more cooperative. I saw a ‘tool’ for making the planting cups in a gardening magazine several years back. It was basically a small round piece of wood in the shape of a small bottle and another small piece of wood with a depressions. The idea was to wrap paper around the larger piece of wood and use the smaller to create the ‘cup’. At $15 it seemed a bit steep and just something else to have to keep track of. I decided I could make due with a small pill bottle and the cup of my hand. I made these paper cups last year after and they worked wonderfully.
Paper Transplanting Cups on the Cheap.
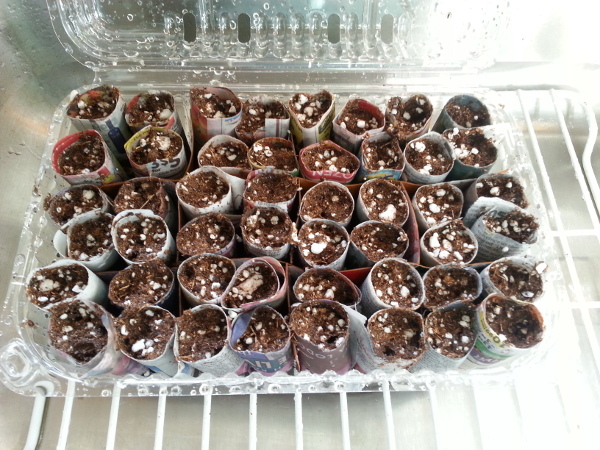
Since these are made of paper you will need something to hold them. I used a plastic container that held some mandarin oranges that we recently picked up at the local grocery. It already had ventilation holes, was on the tallish side and had a tight fitting lid. A large container used to hold ‘greens’ would work fine too as would anything that will hold your cups fairly tightly, allow drainage and possibly some protection from rain, birds etc.
Step 1. Paper strips should have a length approx 2x the circumference of your container and the width should be a little longer than the height + the diameter
Step 1. Cut Paper Strips
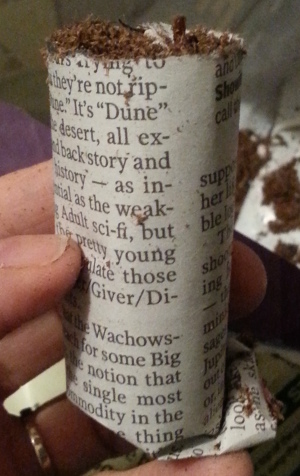
I am using a small pill bottle. It is possible to use a larger bottle but my plan is to start these in a small sized cup and transplant to a larger cup only if I absolutely have to. I hope to get these in the ground rather than have to plant them up. It is important to use newspaper rather than glossy paper from ads or magazines. The former uses soy ink whereas there is question as to what the latter contains. Cut the strips so that the length is roughly 2x the circumference of your container and the width about the height + the diameter.
Step 2. Roll paper around container and fold bottom to create a paper cup.
Step 2. Create the cup
Wrap the paper tightly around the container and fold over the bottom. It is important the wrap is tight, if it is loose, the soil will get between the layers of paper and make the cup weaker. Be careful when you fold the bottom over. I’ve had it tear at the corner which makes the cup pretty much useless for holding the soil in while I am trying to position it in the container.
Step 3. Fill the cup with potting mix tamping down as you go.
Step 3. Fill with soil
Holding the cup in your hand and supporting the bottom with your little finger, fill the cups with a good, light seed starting mix. Don’t use soil from the garden for this, spring for the light airy stuff, it is worth the few dollars. As you fill tamp down the soil. Don’t overdo this step. You aren’t looking for a little brick here but something that won’t shrink to half it’s size when you water it later. I found that dry mix is much easier and less messy to work with than premoisted soil.
Step 4. Once the filled cups are placed in the container, water and let sit to allow the soil to thoroughly moisten.
Step 4. Place in container and water gently.
Getting the little cups to stand up in a large container as you fill it can be an exercise in patience and dexterity. I found that by creating little sections that have room for 4 cups works well. Any cardboard will do. Tho it isn’t removed, the cardboard is only needed for support until the continer is full. Had I had another large plastic container I would have cut it up and used the pieces to create my dividers so it could be washed and reused next time. Since I didn’t have one I used some cardboard from a soda box that I fished out of the recycling bin.
Once your continer is full, water gently. The soil will settle a bit, this is good within reason as it will provide room for the soil that will be added after seeding. I give several light waterings rather than one hard watering. The latter tends to liberate the soil from the cups and makes a general mess of things. Let the container sit and absorb the water, I generally give it about 10 or 15 mintues.
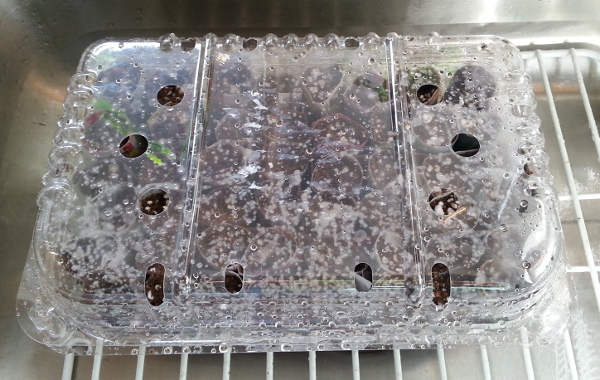
Step 5. Plant seeds, cover and wait.
Step 5. Plant and Wait
Once the soil in the cups has moistened sufficiently, you can begin planting. It is important that you either create little labels or create a map of your container (I take a picture of it with my phone so I’m not frantically looking for it later when everything starts sprouting). If you do create labels keep in mind the height of your container when it is closed. Depending on what I am planting, I generally sow 2 or 3 seeds to a cup then thin out the smaller seedlings. If I am feeling particularly generous I’ll transplant those into another container, if not they go in my salad assuming they are edible. This time around I left some empty cups to recieve the extras later on. Cover the seeds with some potting mix at the depth suggested on the seed packet and lightly press into the cup. It is important to follow the depth recommendation for each type of seed. Some seeds need no covering while most others do.
I generally keep my container closed until the seedlings are up unless it is going to be a very sunny and warm day. If your container doesn’t have adequate ventilation, it is easy to cook your seedlings. Once they are up and almost tall enough to touch the cover I remove the top. If the nights are going to be on the cool side I might place the entire container in a larger clear plastic bag and place it up against the house for the night. Not typically an issue here but it was often required where I lived in KY.
As the seedlings grow you may need to separate them if you can’t get them in the ground while they are still small. Depending on what you plant, some of the slower growing plants may be shadowed by their faster growing neighbors. For this reason it is a good idea to have a couple of smaller containers on hand so that as they grow you can (carefully) move them to a new home if necessary. Once the cups are wet they tend to be very fragile. I usually leave mine where they are unless there is a compelling reason not to. If you are starting a number of different types of seeds it isn’t a bad practice to use several containers, planting the ones that have roughly the same growth rate and watering needs together in the same container.