So two years ago I started this oven project. I had high hopes of finishing it that year but starting grad school left me with little free time and the weather soon turned to insure it wasn’t happening in 09. 2010 started out great, I was ready to get back into the mud once the weather warmed. Life had a different plan for me last year and lets just say I was left not wanting to get into much of anything. 2011 is a new year and time to get back into this project. Last weekend I untarped the mud foundation and found a small ant colony had taken up residence. I checked the base for structural soundness and when I was confident I put down the layer of sand and firebrick floor. The ants and I had a talk. I let them know it was time to leave. They will be gone this weekend.
I opted to make the bricks ahead of time and use the 2:1 sand:clay mix as a mortar. I dipped each ‘brick’ into water coating on all sides to help the wet mortar to stick. The bricks were surprisingly tough and water resistant. I opted for a firebrick arch which required a wooden support to assemble. The arch turned out to be the trickiest part of the project so far. Making sure the inner corners of the bricks were supported by other bricks while not falling required several tries to get it right. I am hopeful this holds with repeated heating and cooling. Time will tell. The beauty of a clay oven is that repairs are possible without too much work. If I determine that the brick arch isn’t going to work I can always opt for a clay/sand doorway.

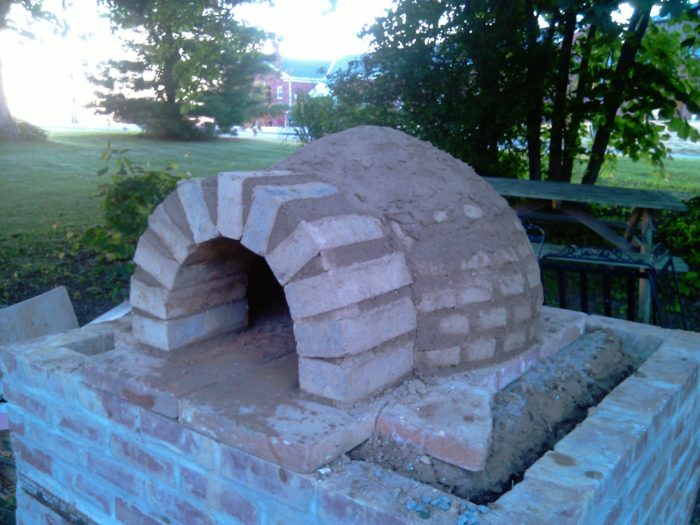
By the end of Saturday the inner layer was half done. As I added layers I would wet the top of the previous layer of bricks if it had dried out. Using the pre-made bricks meant I hadn’t had to use a sand mold up to that point. I had a cardboard cutout of the 22″ diameter dome shape that I used when placing the bricks. I made sure that the bricks touched each other on all sides in the inside of the oven. I stopped Saturday when it became apparent that I would need some kind of support for the rest of the dome.
On Sunday morning I cut out a wooden circle slightly larger than the remaining opening. I cut it in half to get it inside the oven and placed it on a couple of stacks of bricks. I piled sand to complete the dome shape and continued to lay ‘brick’ and build the firebrick arch. The last couple of bricks had to be shaped to a v shape to go into the remaining space. I was pleased at how much work it took to cut these down with the edge of a hand trowel. By Sunday evening the ‘inner sanctum’ was complete. Since the bulk of the oven was already dry at this point I removed the wooden support for the arch and sand dome. It held beautifully.

By Tuesday it was dry on the outside but the inside was still damp. I was needing to tarp it for a coming rain and wanted the inside a little drier. I opted for a small newspaper only fire to test the drafting and dry things out a bit. It performed like a champ.

Once I get back from vacation I will add the insulation layer and the outer layer. My wish is to make a lime plaster outer layer but I may end up doing a clay sand layer first if I can’t come up with the lime to make the lime putty. I should have my first pizza later next month. 🙂